CAGD 230 Digital Modeling
Game Scene
Weeks 4 &5
12/06/19-12/17/19
To start off on the week after Thanksgiving break, the development process went from a steady pace to struggling with great difficulties towards the end. My scheduled work load did not plan out as anticipated and resulted in pulling the short end of the string. I underestimated the amount of work given that resulted in some last minute scrambles. This resulted in a sour taste and I am unsatisfied with the amount of work left untouched. I will mention my difficulties experienced and problems encountered later.
Accomplishments:
What I was able to accomplish from Thanksgiving break to Finals week was first, editing/modeling the modular pieces. Back peddling to week one, I made a to do list on required modular pieces necessary to create the Ghostbuster's building. That list is checked off going into the start of finals week. After finishing the modular pieces, I quickly worked on UVing. In the majority of finals week, I finished most of the UVing for the parts needed. I attempted to align and connect the modular pieces then stumbled upon multiple problems. Pieces weren't lining up on the grid along other issues to be discussed in the development process. I also checked back on the assignment guidelines. A lot of work had to be done from reviewing and my work load began to carry weight.
Fast forward to the final day of development, my group was able to export buildings we modeled in Maya to Unity. Our buildings and props created in Maya is to be transferred and grouped together into one scene with terrain and its environment in Unity. We are also required to make a power point presentation of three of our Unity renders grouped together
Here is our group presentation:

Renders of Group scenes together:


My Maya game scene: 4950 overall poly count


Development process:
Initially, my plan was to model as many pieces as possible, connect and align the pieces to make a building module, texture, then export the textured building to Unity. I was wrong. I spent way too much time worrying about attention to detail on small parts for the Ghostbuster's building. This slowed down my progress a bunch since I was not aware of its poly count later. The triangle count was also a huge problem. In my modular pieces, I didn't notice the high poly count in some of my pieces, such as my front gate. The front gate took way too long in the making as I spent almost a few days just trying to reduce its polys (From 900 to 180). Also the misalignment of modular pieces caused another problem. The pillars was the big reason, they didn't up well with the grid and took quite a while to fix. On top of alignments, numerous N-gons and triangles appeared. This was definitely tedious work as sometimes using the multi cut tool didn't work and caused more triangles/ cut out shadows. I spent the majority of the time reworking my module pieces for alignment, then forgetting to leave time for texturing.
UV mapping:


Lesson learned/future improvements
In the process of making this project overall, I learned that it's probably a better idea that work planned is to be done right away before planning ahead. I did not expect tons of tedious work from little mistakes in the process that ultimately resulted in halting my progress ten folds. It was irresponsible for me to decide to texture on the very last second, especially when I lacked the skills required for it. In future projects from CAGD projects to outside, I learned a valuable lesson to get work done quickly and efficiently as possible (whether or not major or minor) before planning too far out.
11/21/19-12/05/19
In this week we are expected to continue modeling our modules and UV'ing. The picture below show the progress I made during weeks 2 & 3. During the following weeks I was able to model a decent amount of modules planned from week one, specifically the lower section of my building. Problems that occurred during the weeks were that I did not work on this project as much as I wanted to due to time constraints and such. I will do my best to manage my time more wisely and allow more work done before working on Unity. From the modules below I modeled the main gate, wall with ledge, wall corners, wall support, bottom windows, door. On the upcoming weeks I plan to finish modeling the listed models, along with modeling the upper section of my building that includes big windows, small pillars, fence grilles, window borders, and bottom section decors. I attempted to UV the main gate, but stumbled upon some troubles stitching edges on proper layouts, though I was successfully able to texture a corner wall building. When finished modeling the modules, I will be able to connect the pieces together to make a finished modules of the Spiderman Firehouse.


Week 1
11/14/19
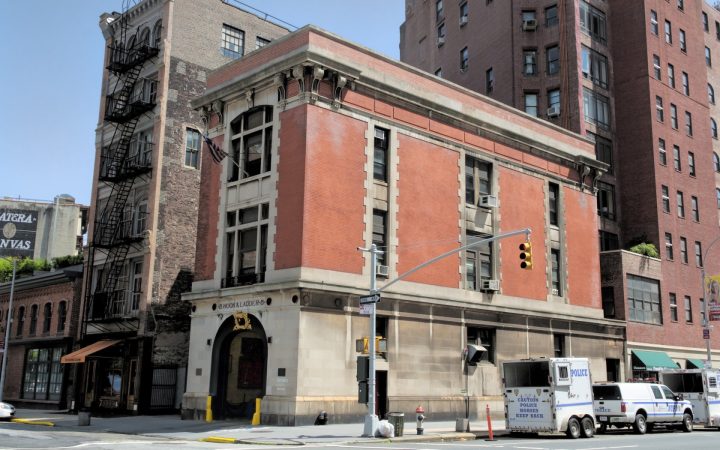
For our next project, we get to work in a group and we are assigned to choose one game scene between BioShock Infinite, Witcher 3, or Marvel's Spider Man. My group of three, including myself decided to work on Marvel's Spider Man (PlayStation 4). The objective of this project is to choose a reference building from the selected game's environment and collaborate with group members to make a scene by using Maya and Unity. We are to create a terrain surrounding our world using Unity and 3D modeled buildings with Maya. The building reference I chose to work on is the Fire House (Ghostbusters).

Objects I plan to make:
1 Modular building
Sidewalk pavement
Fire hydrant
Garbage bin
American flag pole
Ladders
Fence 'Grille'
Six sided stars
Main door/side doors
Windows
Window borders
Pillars
Ledges
My group members chose the Sanctum Sanctorum (Dr. Strange) and an apartment building beside it. Our idea is to place our reference buildings in one block of the city.


Living Room
Week 5
11/05/19

The small table beside the couch was a rough process in connecting uneven vertices which resulted in weird shades. Invested too much time to smooth out edges of spheres and ran out of time making a psd for the table top. I got stuck on making the lamp glow, struggled with texturing the cabinets with wood and lighting. Luckily I was able to get a glow out of my Nintendo switch, but still didn't answer my other questions. Unfortunately, I didn’t have enough time to complete UV/texturing objects as I wanted. On the next project, I will invest more time seeking out for help on UV mapping and focus more on the skills I lack.


Total Hours: ~30
What I learned:
Drastically improved on utilizing the multi cut tool to connect broken vertices, edges, and faces with more than 5 sides. Overall, I learned many skills using Maya as well as lifelong lessons working on the living room project. Smoothing edges on objects, lighting, improved knowledge of Maya modeling in general. I’m proud of how much I've accomplished through many struggles on working in this project. Time management was definitely a big factor that held me back for the most part, but in the end, I pulled through and learned many useful skills I never thought I would learn in a given amount of time.


Week 4
10/28/19
Other than finishing a two piece table, I haven't made much progress from week 3, but I plan to make necessary adjustments to my problems in the last few weeks.
Week 3
10/21/19
I have no renders of progress to show as this week has been very unproductive and nonexistent on my end. Due to a constrained workload and poor time management outside this class, I failed to make any contributing progress towards the living room project.
Week 2
10/14/19
10/14/19


In this week of my new attempt, I modeled a couch, chair and created a room guideline (window border). Since I struggled on matching the size of the room along with other problems on my first attempt, I will finish this process last. I also struggled with modeling the table and couch from the previous project, reusing the same failed couch on my first attempt. This week I plan to focus on my past mistakes and improves upon them.
Skills I plan to work on are extruding objects and the alignment of vertices and edges.
Skills I plan to work on are extruding objects and the alignment of vertices and edges.
Week 1
10/7/19
In the first few work days, I looked through finished living room projects from previous 230 students to develop some sort of idea on what to create.


Initially, I wanted to work on a Family Guy living room, but struggled on making complicated objects. I spent way too much time figuring out how to make unknown objects. Skills I stumbled upon were extruding angled faces and filling gaps of uneven vertices/edges causing weird blank spaces. I had difficulty remaking the couch, table, room decorations (extruding doors, borders) and the approach of making a staircase on the side.
 |
| Reference |
Ultimately this led to me finding a more simple living room project, so I don't over complicate the process of modeling and UV mapping in the end. Also I had some trouble modeling previous projects like the table and couch, in addition of UV mapping the expo marker with reference image. Working with easier objects would allow me more time to spend on practicing solutions on previous problems in the past.
By the end of this week, I basically spent most of my time attempting to make objects I thought I could do, resulting in failure. For my second approach on this project, I hope to fix these mistakes by learning the basic skills necessary on more easier objects, backtracking my pace. I've done some research and looked through guides on certain skill sets involved with Maya. Hopefully this answers these guides will help me in the following weeks.
__________________________________________________________________
__________________________________________________________________
Grocery Shelf
10/08/19
In this project we were to make a grocery shelf consisting of one plastic item, three glass items, and six boxes. We were to use the basic knowledge from previous project, Dinner Prep.


__________________________________________________________________
Dinner Preparation
10/01/19
In this project we were required to create a scene of a dinner preparation.

One major problem I encountered while working on this project was UV mapping the three objects.

__________________________________________________________________
Table & Couch
09/24/19
In this project we were to make a Table and Couch that were sold at IKEA along with an required reference image.
 |
In this project, I failed to follow the instructor's guidelines as I followed through outside tutorials on how to make the couch.
|

__________________________________________________________________
Expo Marker
09/19/19
In this project we were to make the "Expo Marker" and were handed some helpful tutorial videos to guide us making the cap, body, how to UV map, and using Photoshop.
 |
This was one project I struggled a lot with. Some problems I encountered while working on this project was scaling the objects using Maya, UV mapping, and time management. Out of all of the problems I had working on the Expo Marker, I struggled the most with my time management. I underestimated the time given for this project and underestimated the time that should be spent on following Jennifer's tutorial videos. The farthest I gotten into her tutorials was until the UV mapping. Luckily I was able to add in some coloring last second with the help of my classmates.
|

__________________________________________________________________
Primitives
09/15/19
For our first 230 Modeling project, we were to make a primitive scene using Maya. After looking through many previous Primitive examples for inspiration, I decided to stick with a shed in the forest type of scene. I wanted to keep it simple, so I can learn the basics along the way. I started off with simple cubes and rectangles to create the shed, roof, and fences. It took me a while for me to adjust with the controls of Maya. Later on I learned how to duplicate objects, as well as knowing where the X and Y axis is located.
 |
Near the completion of creating my primitive scene, I encountered few difficulties consuming a majority of my time. Some major problems I had was the rendering process and shadow through directional lighting. Positioning of lights, camera placement and overlapping, I was able to overcome these obstacles with the help of the instructor and my peers. Then I noticed there wasn't any color in any of my objects after finalizing my renders. This is where I ran out of time and the top picture is the result of my first project.
The second picture was taken a month later and I was able to add color to the objects along with background lighting.
|


Comments
Post a Comment