CAGD 470 Game Production
Night Watch
I am recruited to a team of four as an 3D Modeler/Texture Artist. The game we are creating is a top down puzzle/strategy type game called Night Watch, while using the Unity game engine. In our game, players attempt to prevent thieves from stealing valuables by placing various security measures throughout a building, while minimizing their total cost of expenses. Once ready, they must use their security setup and navigate carefully to prevent further losses.
Final
To start off with what I was able to do within the duration of 7 Sprints. Throughout the process beginning to end, I believe I showed improvement in the quality of work given and in a more ideal, timely fashion when comparing my progress early on. As I struggled my way approaching a new role of 3D Artist (Environmental), I gradually proved myself in terms of the quality of work showed in the end. I slowly got more familiar with handling the tools provided in Autodesk Maya and Adobe Substance Painter and made use of proper work execution when eventually learned. | ||
Modular Pieces & Textures
|

 |
| Pictures |
 |
| Character 1 |
 |
| Character 2 |
I have learned many workflows utilizing the tools available in Autodesk Maya and Adobe Substance Painter efficiently, and the importing process into Unity, as well as getting more familiarized with GitHub. I learned necessary workflows of modular modeling precise building pieces, texturing process in floor tiles and obscure objects, and learned the process of developing character models. There is still much to learn and I must strengthen my weak points to achieve greater in future projects. It was a rough process getting more familiar with the following softwares, but most importantly this was a learning experience to consider. This was definitely a wild ride and I'm determined to further develop my craft in future class projects.


Besides the many smaller cuts in minor design detail, the modeling and UVing process was pretty straight forward. I was able to transfer the fbx and texture the model with ease, but one problem that took me some time to adjust and work around was the process of exporting textures to Unity.
After retexturing and learning from my previous mistakes from creating the patrol guard model, I was able to clean up and apply a more efficient work flow for the Thief model.


 We had split preferences deciding if we should have our layout with precise measurements and having the pivot snapped in the corner (blue) or having the pivot centered with trims standing out evenly on both sides of grid spaces.

Sprint 6
In Sprint 6, I was able to complete tasks aimed to give players more of a feel of a general office, fixed some Z fighting from pieces that didn't exactly connect, and a few more prop pieces.
Floor Textures (Trello: 2 points)
I added a variety of floor textures to help players easily distinguish what room they're in. I made a brown, red, blue carpet texture along with a brown ceramic tile using Substance Painter. The light brown ceramic texture for hallways and different color carpets to help bring variety in rooms so they don't all look the same.
X & T shaped wall pieces (Trello: 1 point)
These shaped wall module pieces were to fix Z fighting, a flickering lighting issue, and was necessary to add additional lights into our game. This was done by taking previous wall piece modules, such as the corner wall, then mirror and extrude appropriately in Maya.
More props (Trello: 3 points)
- Bookshelves
- Dial up phone
- Tables
Added a large bookshelf and a medium bookshelf, dial up phone, and tables. These prop tasks were pretty straight forward and no serious problems to be talked about.
I ended Sprint 6 with a total of 6 points. For the final sprint, my tasks assigned aren't anything too major since we plan to flesh out our game without the addition of big assets that may be potentially game breaking. My final sprint tasks look to be more smaller decorative models/texturing to help polish and fill in some areas in the wall that may be dead space. More cards may be assigned during thanksgiving break and/or soon after.
Sprint 5
For Sprint 5 my tasks was dedicated to fill as much dead space as I can with general office space props. This was necessary so that it would give the player a sense of what environment they're in when moving around areas.
Prop list to make rooms feel more realistic to a general office space (Trello: 6 points)
- Lamp
- Janitor assets
- Wet floor sign
- Traffic cone
- Mop
- Filled Cart
- Couch
- Picture Frames
- File Cabinets
- Potted Plants


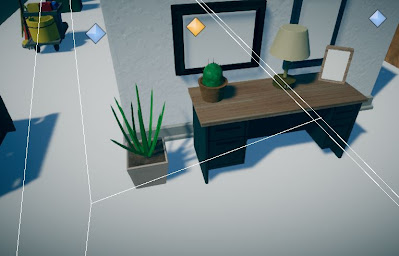
Not much needs to be said as the workflow process overall was relatively smooth for Modeling, UVing, and texturing the prop list above.


However one prop I did have some trouble with and spent most of the time available on was the plant models. It was the modeling process that caught me off guard since I had no experience working around plants and my approach was a little rough, especially for the cactus. The first grass like plant wasn't too bad, as I just shaped around a cone and mixed with a deform bend tool to get the curved shaped necessary for the bent spiky look.
 |
| 1st approach |
For the cactus, I didn't think it would be too difficult until I found out my first finished approach was around 1.5k-2k polygons, which was a little excessive for a small prop. I was originally thinking about texturing/stamping the stem pieces into the cactus, but it didn't give me the 3D look I wanted. I found out the stem pieces I duplicated from the 'grass' plant was roughly 100 polys each, so I reduced/reshaped to have them around 30 polys. After confining the look and into Unity, the overall shape looked like a marble in a pot. Therefore I re did the whole process and shaped the cactus to be more oval-like and made the stems a little bigger. The final look is an improvement from the original export, but I would definitely have to approach future plant models with a different slate for more appealing result.
 |
| 2nd approach re modeling |
Open/Closed Windows (Trello: 1 point)
I also remodeled the existing window so that players are able to distinguish what windows are opened or closed more easily.
This Sprint was pretty straight forward as my main tasks was to make necessary props to fill in dead space for our game along with adjusting the window. I ended the Sprint with a total of 7 points.
Sprint 4
The main focus for this sprint's tasks was on designing and modeling key characters that would be recognized as a Patrol guard and a Thief in the game.
Recognizable Patrol Guard model (Trello: 3 Points)
Card: "As a player, I need the guard to have a recognizable model so that I feel like I can tell who I am playing as."
 |
| Finished Patrol Guard model in Unity |
This was my first time creating a character model for any game and I learned a few valuable lessons in the process. First was gathering reliable references for an appropriate design style for the game. A Chibi Japanese style low poly 3D model was recommended, so I followed a few tutorials to help construct my base model.
 |
| Model & UV's |
 |
| Exported texture problem: ~3-6 each folder |
 |
| Combined solution |
I was able to import the texture sets into Unity, but there were just too many individual texture imported for the patrol guard, which was around 35 - 40. This was caused by working around multiple lambert materials from Maya into Substance Painter and became an issue when applying Unity material presets. The process of applying a handful of texture sets was too tedious and could cause some unnecessary complication later on. After further research, I found two solutions for this problem which was either to combine multiple texture sets into fewer sets using Adobe Photoshop, or just work with one/two materials in Maya.
In the end, i'm satisfied with how my first character model looks in Unity.
 |
| Substance Painter textures |
Recognizable Thief model (Trello: 3 Points)
Card: "As a player, I need the thief to have a recognizable model so that I feel like I can tell who I am trying to hunt down."
 |
| Final Thief model in Unity |
 |
| Reference |
 |
| Model & UV's |
This work flow process was relatively simple. I used the existing patrol guard model for the thief model to save time with mesh work and UV's. I used one material lambert from Maya this time around, so that it would only be exported as fewer texture sets from Substance Painter. No major issues for this model as everything went by smoothly into Unity. Less texture sets are now used and I can implement this method with other future assets.
 |
| Thief texture maps |
I'm satisfied with the final look of the thief model and I like the mask idea my designer preferred to me, it really contributes a more sneaky, disguised approach to the character. 
By the end of Sprint four, finished cards resulted with 6 points total. I was able to finish another Trello card, which was to 3D model, UV and texture file cabinets; critical asset for our game, but it was finished too last minute for the time being and was moved to next Sprint. I'm somewhat okay with the amount of work completed in this Sprint considering my pacing overall with this team. I wished to complete more, but due to other conflicting projects/time schedules it was difficult to do so. This is something I would need to improve on moving forward.
For next sprint, I am expected to work on critical assets that distinguish game boundaries and create more assets that make our game feel more alive.
Sprint 3
I've gone past the rocky road and now gradually picking the pace into the main road. I feel like I made a lot more progress in this sprint.
See through window & References (Trello: 2 Points)
To start off Sprint three, I gathered references, discussed with my game designer the right design fit, UV'd and textured a clear double sided window so that players can look through both sides.
Other than tedious misalignment errors and a skewered workflow process that I was able to manage about, some major problems I had that delayed the time spent was having weirdly flipped UV's, overlapping faces, and learning how to make a clear see through glass in Unity. During the Maya process, there was some invisible n gon faces underneath the bordered curtains. I fixed those Maya problems using the cleanup tool to spot/clean all around. 
However afterwards was the time I spent the most on, which was getting a glass material into Unity. First I was able to make a glass material in Substance Painter, but the method I used before in previous Substance Painter versions, which was to open shader settings and apply pbr metal rough alpha into the material was outdated with the most recent version, so I had to find alternate methods in Youtube. After some time I realized it wasn't a Painter problem. I found out in Unity I just had to switch the rendering mode in the material to transparent then adjust the color and smoothness to get the right amount of glass glare.
Door with side trims (Trello: 1 point)
Next I modeled, UV'd and textured a door modular piece so that closing rooms wouldn't look out of place. Outside of minor problems with measurements this process was relatively simple.


Computer desktop & monitor (Trello: 1 point)Lastly I modeled, UV'd and textured a monitor and a desktop. This process was pretty straightforward. Though one pushback was the monitor design. When viewing its back side in Unity the model looked a little too bland with just a flat square. To fix this, I made a white support in the back to not make it too primitive. I added a blue light to the monitor and green light emissive for the desktop power button as well


By the end of Sprint three I was able to put up 7 points with the adjustment of realistic wall textures added in. Nothing really much for me to say other than minor adjustments from previous sprint and I feel like I'm getting the groove back of modeling and texturing process again. With that I'm satisfied with the progress being made. In the next sprint I'm expected to start making character models for our game. I'm both excited and eager to learn a new skill set for next sprint.
Sprint 2
This sprint was a bit of a rocky road with unexpected pot holes that ended in a pitstop for me. It all started from the previous sprint when I tried texturing the original wall modules.
Redesigned modular pieces (Trello: 1 point)
After the UV's were complete and I started texturing there was a lot of bleeding and overlapping textures all around. I did not like how the modules appeared after texturing properly, so I redesigned parts of the double-sided walls so they would appropriately distinguish each side. I also beveled as many hard edges as possible while considering the poly count for a more smoother look.
Problems encountered
A new design look would also lead to appropriate adjustment to each side so that each edge/vertices would snap together properly with no obvious error when viewed in Unity. This half of the workflow ate a chunk of the available time I had for the duration of the sprint as I went back and forth re checking if all the measurements were precise.
 |
| Misalignment |
Another road bump on the road that eventually lead me to detour off track was the process of texturing the redesigned wall modules. When importing the completed fbx into Substance painter, I didn't like the selections shown to make the 'realistic' wall texture I desired. So I made a risky decision to make my own material using Substance Alchemist, which was mainly used for floor textures. I was basically learning a new skill workflow on a software I was unfamiliar with. The whole process in the end made almost no difference when using some of the defaults in Substance Painter and that also costed a chunk of my time.
 |
| Alchemist new wall material |
To keep things short, I had a ton of unnecessary issues editing and importing into Painter/Unity and had to ditch the Alchemist method to meet time requirements. I would have to look back on my own spare time to fix the errors I had.
I was hoping to pick up the pace from previous sprint, but failed to catch my footing and ended with a slow walk. I technically finished the sprint with four points out of eight assigned (if the texturing modular walls task was added in). Unfortunately I submitted the task too last minute for my producer to verify in time to consider.
This would result in the sprint total of 1 point, which is totally unacceptable all around. I completely understand the amount of work to be expected in a two week sprint and it is very irresponsible of me to attempt to fix up last minute tasks. I am aware on the fact I failed my part of the team role to keep up with the team's pace. To get back on the main route, I would have to re evaluate my faults and make drastic changes in order to get my workflow efficient with more tasks done overall.
Realistic wall texture with UV's (Trello: 3 points)
Sprint 1
This should be an interesting semester working as a new role, Texture Artist. I look forward to learn new skill sets and cooperate with my team this semester!
References (Trello: 1 point)
To start off, my first task was to gather references for our desired art direction for our first level, which was a political themed office building.
 |
| (1) Trello point |

This took some time for me because I knew how an office building would look like, but not a politically themed one. I did some research and took some areas in the white house such as the oval office as a reference to also future 3D asset lists for other rooms.
Basic Modular double sided wall trims & corner piece
I was able to create a few basic trims and boundary pieces to be implemented into the Unity game engine later on.
- Short trimmed wall trim 1(1x2)
- Trimmed wall trim 1 (2x2)
- Corner trim 1 (1x2)
 |
| (1) Trello point |
 |
| (1) Trello point |
I referred these trims based on every day office walls, which were relatively simple since most office building walls show little trimming detail (bottom extruding trims).
Maya to Unity Sizing and pivot check
The last task I was able to complete was to export the modular pieces to Unity with the correct sizing and pivoting for easier placements. In the picture below, I was able to snap all three modular pieces along the grid. 
Problems encountered
This task was unexpectedly difficult and consumed a majority of my time for Sprint 1. First was the pivoting problem when exporting from Maya to Unity. There was a lot of miscommunication and misunderstanding with my team members since we had different preferences and measurements when viewing the modules in Unity. 
Another problem was the appropriate sizing when exporting from Maya to Unity. This also was time consuming because I was also confused with the pivot problem at the same time, which caused for some inaccurate placements and measurements. To fix the sizing issue, I double checked all the module pieces extra close and snapped the vertices accordingly along the grid.
Sprint 1 started off with a slow start with the pivoting and miscommunication issues and ended with 3 points. Hopefully by next sprint I can catch my footing and pick up the pace.

Comments
Post a Comment